There is a group on Face Book called Addicted to Tie Dying where tie dyers from all over the world share their expertise with newbies.
It is fascinating going through the photo album!
Saturday, August 6, 2011
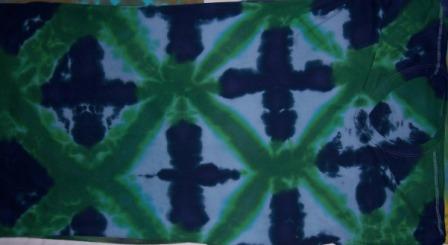
What color will the 'spider' be?
I have figured that one out finally! When you swirl a spiral, the side closest to the table is the better swirl. Dye applied to that side turns out to be the back ground. For the Spider, swirl down from the neck.
Here 'dark brown' was applied to the table side and maroon the other.

Here 'dark brown' was applied to the table side and maroon the other.

Production Work
Because I am not much on the production end of Tie Dyeing, I have spent the last 20 years teaching others. Last year was the first year I applied to sell at a craft fair. Our local Arts Center puts one on at Thanksgiving and takes care of collecting and paying the state sales tax. I was encouraged to apply and was surprised actually to be accepted. It is after all just 'tie dye.'
As luck would have it, I sold enough to make it worth my while. Instead of all new t-shirts I look for blanks to dye at thrift stores. I look for high end natural fiber items that have been donated. This serves both the ideas of reuse and supporting a variety of non profits. With the economy the way it is though more people are shopping at thrift stores and thrift stores are charging higher prices. I am finding that these days I can buy new cheaper than thrift. But I like the variety of styles so I keep looking.
I dye 12-15 items a week, spending about 3 hours on the tie-ing and dye-ing one day and 2-3 hours tending the washing machine the next. While my blanks are soaking in soda ash in the washer I choose my pallet of colors. I then choose the color combinations and how I will fold them, making a list so I can recreate a pattern or combination if I particularily like it. The dyeing then is routine because the thinking has already been done. Once the dye is applied they go into plastic bags and batch overnight.
Sun
This sun was created by drawing a 1/2 circle and pleating along the line (DIAMONDS OVALS SQUARES). Dye was applied in 'chaos' fashion (ELECTRIC BUNCHINg) to the gathered circle with two more bands tied finger width apart. Red, yellow, and orange dye were applied in 'chaos' with red and orange alternating front and back on the bands.

This is the back of the shirt dyed black. I like the lightening effect. I simply 'swirled' the body of the shirt bottom up.


This is the back of the shirt dyed black. I like the lightening effect. I simply 'swirled' the body of the shirt bottom up.

Tuesday, May 3, 2011
Two versions of flower fold

This shirt was folded length wise (from collar to hem) in fourths, then folded into pleated triangles. Each corner was dyed a color.
This shirt was folded length wise, pleated into triangles. The one corner was dyed navy and the other two green.
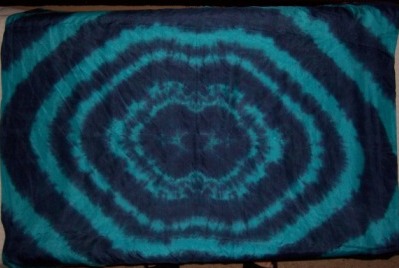
Another Spider

This was a spider fold swirled down from the collar. One side dyed chartreuse, the other navy blue.
Silk continues

This was folded mandala style and rolled into a jelly roll and dyed two colors

This was folded into quarters, pleated from the center at an angle, rolled and dyed two colors.

This was folded into quarters, swirled from the center and dyed 4 colors.
Thursday, April 21, 2011
Spider Spiral

I have been trying to figure this one out for awhile. This is my most successful attempt to date.
The shirt was folded in half with only one layer. (I found the center at neck and hem by folding the shirt arm to arm and marked it, then shook out the shirt at the marks I had made.) The spider was swirled down from the neckline. Red dye was added on one side, blue the other. I used the LWI method, adding dye to a dry shirt and pouring soda ash solution on later.
LWI beside Traditional Tie Dye

On the left is a t-shirt done with Low Water Immersion (LWI) technique and on the right a t-shirt done traditionally. They are the same brand, both pre washed (scoured) and folded in a 'spider' spiral, twisting up toward the neckline; both dyed with the same blue and green dyes, blue on one side, green on the other.
The LWI shirt was dry when I squirted on the dye and I added the soda ash after about an hour.
The tradional shirt was pre soaked in soda ash, spiraled than dyed.
Both were batched overnight...the LWI in it's own bucket, covered and the other in a plastic bag. (The LWI may have been at a lower temperature.)
Sunday, April 17, 2011
Paula Burch
I cannnot get enough of Paula Burch! She is a chemist/dyer who has shared her knowledge and expertise with many a dyer. She patiently answers questions about dyeing that often seem to come from left field.
She has a Facebook page.
Plan on spending hours exploring her her multi layered website. While you are there check out the Dye Forum community.
If you can't find the answer her...you don't know the queston! Her site and input were of great help to me when I was working on a 4 day curriculum for a summer program for kids at my local junior college.
PRO MX Reactive Dyes
Check out the Pro Chemical & Dye site for detailed information about the type of dye I use for tie dye. I lurk on many dye lists and this site keeps coming up again and again.
Saturday, April 16, 2011
Silk scarves
I love to dye silk. This is navy and tourquoise.

This is navy and green.

This is navy, deep purple, and chartruese.
This is navy and green.

This is navy, deep purple, and chartruese.

Dye placement for a spiral
This photo is the 1st stage of a hybrid tie dye and low water immersion (LWI.)

See how the dye is applied in 'pie' shapes.
I applied the dye to a completely dry shirt, folded in a traditional swirl from the lower front corner. I let it sit for an hour or so then added a solution of soda ash and hot water. I added enough water to cover the item in the bucket.
This is the end result.

I only applied dye to one side of the item. That is why there is so much white.
Results of recent dye session
This is a shirt I pleated vertically then rolled into a jelly roll and dyed as you would a spiral(in pie shapes.)

I like the distintion of top and bottom...totally unintentional!
This is a 'spider' swirl. I like the shape at the top.

{A 'spider' swirl...the shirt is folded in half and swirled from the fold.}

I like the distintion of top and bottom...totally unintentional!
This is a 'spider' swirl. I like the shape at the top.

{A 'spider' swirl...the shirt is folded in half and swirled from the fold.}
Dying an Item
This is a pair of pillowcases. I want them to be similiar in color placement. Since this is Tie Dye there is no 'identical' option.

This is the pair after washout.

The pattern was created by folding the cases in half and drawing a line at an angle from the corner. Be sure to put the two closed ends together or the two open ends together to get the diamond effect.

This is the pair after washout.

The pattern was created by folding the cases in half and drawing a line at an angle from the corner. Be sure to put the two closed ends together or the two open ends together to get the diamond effect.
Mixing Dye
Once the dye is measured into the 16oz plastic bottles I add 'dye water.' This is a mixture of 2 cups urea per and 1 teaspoon synthrpol type detergent per gallon. People who are scientific minded tell me that the urea helps keep things 'wet' longer and the synthrapol helps the dye 'migrate.'
Here is a picture of some undissolved dye particles.

I have to shake the bottles really well. I usually turn them upside down to make sure all the dry dye has dissolved from the bottom.
This picture is transferring the dye from the 16oz storage bottle to the 8oz squirt bottle I use to pour dye on the item.

I label all my bottles using masking tape and a sharpie. It is really hard to tell one color from another when they are in liquid form.
This is what I keep my dye in. The crate fits inside a small refridgerator. I use those small bungie cords for dividers.

Monday, April 11, 2011
Measuring
Since I am not seeking the uniformity of consistent color every time, I use only a teaspoon to measure. (If you are seeking consistent results you need to use a scale and measure your grams every time.)Usually 2-4 teaspoons of dry powder is enough for me to use for an 8oz bottle of liquid dye. Since I am using 16oz water bottles I need to double the amount called for.
I purchase my dyes from Dharma Trading Co. Take some time to explore the Dharma site. There are plenty of 'how to' pages with plenty of detail.
I purchase my dyes from Dharma Trading Co. Take some time to explore the Dharma site. There are plenty of 'how to' pages with plenty of detail.
Measuring implements

This is my measuring set up. I use implements only for this. It is recommended that any tool used for dye not be returned to use with food.
I use the tea strainer to get the 'lumps' out of my dye powder.
This is the only time a mask is needed. The dry particles are miniscule and can end up in your lungs. I understand that some have gone years with no reaction and then suddenly develop a severe alergy and can no longer use dye powder. (This is my first use of the mask. I have been listening to those who came before me! It was interesting to see that the front of it had faint hits of color when I was finished!)
Tedium to start

The first stage is the most tedius for me. Having to measure the individual dye colors seems to take forever and involves a lot of preparation. First I have to label the bottles. Now that individual plastic water bottles are no long PC I wonder what I will use for replacements?
Just what we need...
My goal is to post my progress as a Tie Dyer this year. I intend to post both text and pictures describing my efforts in the Art and Craft of hand dying items for daily use.
I subscribe to a number of internet groups that share experiences with dye and the experimentation they do. I have learned much from them and hope that newbie tie dyers may benefit from my addition to the glut of information.
This started as a 'what have I gotten myself into' project 20 plus years ago. I had volunteered at a summer camp for middle schoolers and was asked to 'organize' crafts projects to include tie dye. It has evoloved into a portable tie dye studio that I take various places for fun and what amounted to a small profit to be reported on last years taxes.
Taken a step further, I produced items for a local arts center holiday fair by buying items at thrift shops to dye. I have been invited back to that show this year and will share my adventures in reusing items cast away by others.
Subscribe to:
Posts (Atom)